
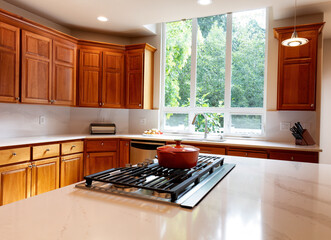
Cabinet Refinishing San Jose CA is a process that involves removing the existing finish from your cabinets and applying a new one. The final result is a clean and refreshed appearance for your kitchen.

Refinishing is a great option for homeowners who want to give their kitchen a facelift without spending a lot of money. It’s also a good choice if your cabinets are in good shape and you just need a change of color.
Cabinet refinishing is an affordable alternative to replacing your cabinets and can breathe new life into your home’s kitchen. It’s a process that involves cleaning, stripping, and painting or staining your cabinets. However, it’s important to prepare properly before starting to ensure a quality finish. Proper preparation will help minimize any imperfections and ensure that the paint or stain adheres correctly.
First, remove all hardware from the cabinets and wipe down the surfaces to remove any dirt or grease. This will make it easier to clean the cabinets and will help prevent any paint or primer from accidentally getting on your hardware. Next, use a tack cloth to remove any remaining dust from the surfaces. Finally, inspect the cabinets for any imperfections such as holes, dents, or scratches. If you find any, use wood filler to fill in the area and sand it smooth before proceeding.
Once the sanding is complete, it’s time to prime. Applying a high-quality primer like KILZ 3® Premium Primer will ensure that your paint job is smooth and even. It will also provide a good foundation for your color, which will promote better adhesion and a long-lasting finish.
When applying the primer, be sure to work in small sections at a time and cover all areas evenly. Wait for each coat to dry before applying the next one. Once the primer is dry, it’s time to start painting. Again, work in small sections and be sure to use long strokes. It’s also a good idea to use a painters tape to protect any areas that you don’t want to paint, such as trim or edges.
After the final coat of paint has dried, reattach your hardware. Be sure to use the labels that you created earlier to ensure that each piece goes back in the right place. Once everything is reattached, give the cabinets a final once-over with a clear coat to protect them from any moisture or scratches.
Stripping
Cabinet refinishing is a transformative home project that can make your cabinets look brand new. It involves thoroughly cleaning the wooden surfaces, removing any existing finish and then applying new stain or paint. The process is time consuming, but it’s essential for a high-quality end result. You can do this yourself or hire professional craftsmen for a flawless finish.
Before you begin the stripping process, it’s important to protect yourself and your workspace. Wear a respirator mask to protect your lungs from harmful fumes, and use safety glasses to avoid damaging your eyes. It’s also wise to cover any surfaces you don’t want to be affected by the stripping solution, such as countertops or appliances.
During the stripping process, your furniture will be coated in a chemical stripper that loosens and dissolves the existing finish. Depending on the size and intricacy of your furniture, the solution may take minutes to hours to fully remove all layers of paint and finish. It’s important to follow proper drying times for each coat of stripper to ensure the best results.
When the old finish is completely removed, your woodwork will be exposed to the elements. If the weather is cold and damp, it’s a good idea to cover your cabinets with plastic sheets. This will protect them from moisture and keep the wood dry, preventing rot and mold growth.
After the surface has been stripped, you should lightly sand the cabinets. This will help to roughen up the smooth finish and improve the adhesion of the primer or paint. It’s also a good time to touch up any scratches, nicks or other imperfections.
It’s important to select a quality primer and paint for your cabinets. Oil-based primers and paints need to dry properly, so you should allow them to sit for a few days before proceeding with the refinishing process. Latex primers and paints, on the other hand, dry much faster and emit fewer fumes.
In the past, stripping interior wood was an extremely time consuming and costly project that required lots of labor and tedium. However, modern primers and paints have advanced so dramatically that they can adhere well to most previously painted surfaces. To determine whether your existing paint is oil-based or latex, simply rub a rag or cotton ball wet with denatured alcohol over the surface. If it turns white or swells, the surface is oil-based; if it remains clear or doesn’t change color, it’s latex.
Applying the New Finish
Cabinet refinishing is an excellent way to breathe new life into your kitchen cabinets and make them look as good as new without the cost of a full-scale kitchen remodel. This home improvement technique involves removing the old finish, repairing any damage, and applying a fresh coat of stain or paint to the existing cabinetry. However, a successful cabinet refinish requires the proper techniques and tools to ensure the best possible results. With a little bit of effort, you can create a beautiful new finish for your cabinets that will last for years to come.
Before the new finish is applied, it’s important to clean the surface thoroughly. Any grease or dirt can impede the adhesion of the new finish, and will show up as dull spots on the finished product. Use a degreaser like TSP (Trisodium Phosphate) mixed with water, or any other reputable brand of grease remover, to get the job done. After cleaning, the cabinets should be allowed to dry completely before moving on to the next step.
Once the surface has been cleaned, it’s important to lightly sand the cabinets to prepare them for a new coating of varnish. This is not meant to remove all of the existing finish, but rather to rough up the surface slightly for improved adhesion. Use a fine-grit sandpaper such as 220-320, and be sure to wipe down the cabinets afterward to remove any dust particles left behind.
When it comes to applying the new finish, the best technique is to work with a high-quality brush or sprayer. This will help to avoid air bubbles and ensure a smooth, even coat of stain or varnish that’s free from drips and runs. Always work in the direction of the wood grain, and allow each coat to dry according to the manufacturer’s instructions before proceeding with the next one.
Once the final coat has been applied, it’s time to enjoy your newly-refinished cabinets! Keep in mind, though, that refinishing won’t last forever, and you’ll need to do it again within a few years to maintain a fresh appearance.
Cleaning
Before a new finish can be applied to your cabinets, it is important that all surfaces are clean. This includes both the cabinet boxes and the door fronts. Grease and dirt can impede the adhesion of a new coat, so it is important to have a clean canvas to work with. Once all hardware has been removed and the surfaces are clean, they will be sanded lightly to smooth and prepare them for painting or staining.
The best way to go about cleaning cabinets is with a sponge or cloth dampened with warm water and mild dish soap. For more stubborn grease, oil or grime, you can also use baking soda. It works as a gentle natural abrasive and can really help to cut through grease, food residue or daily splatters.
After washing, you should always dry the surface completely with a soft cloth. Failure to do this can result in moisture damage that will cause the surface to swell or shrink, and it will also cause any paint or stain to peel later on. Always test any new cleaning products on a small area of your cabinet before applying to the entire surface.
If you have kids, it is a good idea to keep some of those disposable wipes on hand for those sticky fingerprint messes. Using a wash or a similar product can really help to get those messes clean, especially with those hard-to-clean areas around handles and knobs.
It is also a good idea to have a bottle of white vinegar on hand, as it is a great natural deodorizer and can be used as a natural cleaner for your cabinets. It also can help to maintain a consistent humidity level in your home, which is important for maintaining wood integrity and preventing moisture damage.
Lastly, it is always a good idea to wear safety glasses and a mask to protect yourself from dust particles and any chemical-based cleaning solutions or paints you may be working with. It is also a good idea to have some disposable gloves and to make sure that your workspace is well-ventilated to avoid inhaling any fumes.